ESD Control Vinyl Tile
Installation and Maintenance Instructions
INSTALLATION OF TILE
TROWEL SELECTION
Type 1 - 1/16"x1/16" Square Notch with 1/16" Flats
Type 2 - 1/16" Half Circular Notch with 1/32" Flats
| TILE SIZE/SUBFLOOR |
TROWEL TYPE |
12"x12"x1/8" Wood,
Concrete, Terrazzo
12"x12"x 1/8" Ceramic, Metal, On or below grade
Seamless 24"x24"x 1/8"
Seamless 36'x36*x1/8" |
2
2
1
1
|
Roller
• Sectional 150 Pound
It is essential that the specified trowel and roller be used. If the
trowel notches are too large, too much adhesive will be used. This will
result in excessive adhesive seepage at the seams and also will cause
the tile to float and shift Clean-up after installation is then very
difficult. In addition, the seams will be at different heights making
them very noticeable and dirt catchers as well. If you delay rolling
the tile because of excessive seepage, adhesive wilt not be adequately
transferred to (he back of the tile causing both conductivity and adhesion
failure. If the notches are too small, too little adhesive will be spread
resulting in conductivity and/or adhesive failure. As your trowel is
used, the notches become smaller resulting in less adhesive being spread.
Worn trowels should be renotched
or discarded.
 The proper weight roller is equality as important as the correct size trowel.
The floor is rolled to flatten the adhesive ridges left by the notches
in the trowel and to transfer a uniform amount of adhesive to the back
of the tile. After roiling the floor, it is advisable to pull up tile
from several locations to check if there is proper transfer of adhesive
to the back to the tile and that the ridges are being flattened. Ideally,
you should barely be able to identify trowel marks, and the entire back
surface of the tile should be uniformly covered with adhesive. If this
is not the case, you are either using the wrong size trowel or roller,
or you are not rolling the floor soon enough. The proper weight roller is equality as important as the correct size trowel.
The floor is rolled to flatten the adhesive ridges left by the notches
in the trowel and to transfer a uniform amount of adhesive to the back
of the tile. After roiling the floor, it is advisable to pull up tile
from several locations to check if there is proper transfer of adhesive
to the back to the tile and that the ridges are being flattened. Ideally,
you should barely be able to identify trowel marks, and the entire back
surface of the tile should be uniformly covered with adhesive. If this
is not the case, you are either using the wrong size trowel or roller,
or you are not rolling the floor soon enough.
Contact ESDcarpet.com for more information on proper trowel selection.
CONVENTIONAL INSTALLATION
Install ESDcarpet.com's Static Control Flooring in accordance with the
following procedures:
- IMPORTANT! Approved ESDcarpet.com
adhesives are an integral component of the ESDcarpet.com
ESD Control System, use of any other adhesive
wit void ESDcarpet.com's Exclusive Warranty.
ESDcarpet.com adhesive coverage is approximately
150 sq. ft. per unit. Consult instructions for
proper subfloor preparation before mixing adhesive.
If installation is to be flash coved, follow
special instructions under FLASH COVING.
- Maintain tile, adhesive, and
roam air at a UNIFORM temperature of at least
70" F, (or 24 hours prior to, during, and
for 48 hours after installation. Ensure that
the installation is well lit to allow effective
examination of tile and installation. II you
have not worked with adhesives before, you will
find that unlike other flooring adhesive, epoxies
do not have nor do they develop a tackiness as
they set up, This makes it extremely important
to roll the door as recommended to avoid raised
edges.
- Each production run of tile
is assigned a lot number which appears on the
carton label. CHECK LOT NUMBERS BEFORE INSTALLING
TILE. Whenever possible, install material from
the same lot number in a given room or area.
When (his is not possible, it is. advisable to
isolate different lot numbers to separate areas.
- Because few rooms are perfect
rectangles and the tile must be laid within a
perfect rectangle. It is necessary to strike
chalk lines at right angles to each other against
which the tile can be laid.
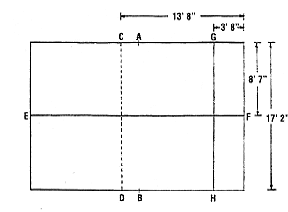
Locate and mark the center point (Point A) of one wall of the room. The
measurement from the wall to this center point will be in feet and inches.
If the inch portion of this dimension is less than 6, the center mark
should be moved 6 inches in either direction (Point
C). This will assure that the trim pieces at the walls will be no less
than half a tile. Now measure the center point of the opposite wail and
mark this point (Point B). If the original center point was moved 6 inches,
move Point B correspondingly. Now strike a chalk line from Point C to
Point D.
Use this same technique to find (The center point of the two remaining
sides of the room, remembering to move the center points 6 inches if
necessary. Strike the bisecting chalk line E-F. (See illustration below)
-
 Next
determine it the center point of the bisecting
lines is a convenient place to start installing
the tile. If some reason you must start closer
to one of the walls, either or both lines can
be moved closer to the wall as long as they are
moved in increments of 12 inches. This will again
ensure trim pieces of no less than half a tile.
(See lustration below. Line C-D moved to form
line G-H). Next
determine it the center point of the bisecting
lines is a convenient place to start installing
the tile. If some reason you must start closer
to one of the walls, either or both lines can
be moved closer to the wall as long as they are
moved in increments of 12 inches. This will again
ensure trim pieces of no less than half a tile.
(See lustration below. Line C-D moved to form
line G-H).
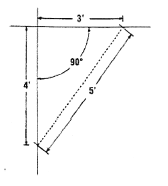
- Now check to make sure the
bisecting lines are at exactly 90". This
is most easily done using the 3. 4, 5 triangle
method, or a multiple of it, as described in
the next paragraph. Starting from the center
point where the lines meet. Measure 4 feet toward
one of the end wads and mark the tine at exactly
the 4 foot point. Starting again from the center
point, measure 3 feel toward one of the side
walls and mark the line at exactly the 3 toot
point. If the angle is exactly 90°, the distance
from the 4 foot mark to the 3 foot mark will
be exactly 5 feet. If it is not, move one of
the lines until the dimensions are exactly 3,
4, 5 feet. The angle will then be exactly 90°.
In large areas use a multiple of this method
(multiply each dimension by the same number to
covers larger area) for greater accuracy. (See
illustration at right).
- Generally, tile is laid in
3 fool sections. Snap an additional Sine every
36 inches away from and parallel to the bisecting
lines (See #4 to #6). These additional lines
are used as a guide to show how wide a spread
of adhesive to make.
- Use a can opener lo cut out
top rims of both cans. Use mixing paddles provided
or a mixing paddle on an electric drill to carefully
mix parts A and B separately. Combine parts A
and B in She can and thoroughly mix them together. NOTE: Adhesive
should not be poured onto the floor until parts
A and B have been completely mixed together.
Any unmixed portion applied to the subfloor will
not cure properly and both adhesion and conductivity
will be affected.
 After complete mixing, IMMEDIATELY pour
all adhesive on floor and spread as soon as possible.
Use 1/6" x. 1/16" square notched trowel
with 1/16" flats, or a 1/16" half circular
notched trowel with 1/32" flats. Do not
allow mixture to remain in container. See TROWEL
SELECTION AND TILE SIZE/SUBFLOOR sections for
proper trowel use. After complete mixing, IMMEDIATELY pour
all adhesive on floor and spread as soon as possible.
Use 1/6" x. 1/16" square notched trowel
with 1/16" flats, or a 1/16" half circular
notched trowel with 1/32" flats. Do not
allow mixture to remain in container. See TROWEL
SELECTION AND TILE SIZE/SUBFLOOR sections for
proper trowel use.
- Spread adhesive, in 3 foot
wide sections, as close to but not over your
chalk line. If you occasionally cross the line
with your trowel when spreading adhesive, do
not be concerned. Any adhesive over the edge
of the line must be scraped up before the next
row of tile is installed to avoid high edges.
- The open time of the adhesive
varies greatly depending on the humidity and
the temperature of both the ambient air and
subfloor. Generally the open time is approximately
one hour. With tower temperatures and, or high
humidity the open lime can be greatly extended.
With high temperatures and low humidity the open
time can be reduced. After spreading the adhesive,
if the tile is installed immediately it might
have a tendency to slide. It is best to wait
until the adhesive becomes tacky to file touch
prior to placing the tile. Be careful not to
spread more adhesive than tile can be installed
into and rolled prior to the adhesive setting.
A good solid transfer of adhesive to tile is
absolutely necessary to obtains proper conductivity.
Note: Adhesive will appear glossy when first
spread and with dull as it sets up. Do not allow
adhesive to set up before laying tile.
- WORK OFF THE TILE WHENEVER
POSSIBLE. When laying individual life, do not
slide tile in to place. The correct procedure
is to place a corner of the tile in place next
to the adjoining tile, carefully guide it into
proper position, and set it in place. When necessary
to work on the tile, avoid shifting by using
a kneeling board and by cutting tile to butt
tightly at all wall junctions.
- A grounding connection is
achieved by imbedding the provided copper strip
directly in the adhesive and extending about
12" beyond the Site perimeter at a position
nearest the desired ground point. (See GROUNDING)
- Roll and cross roil tile with
150 Ib. sectional roller immediately after site
is laid. Roil second time one hour later. Inspect
floor for raised edges one hour after second
rolling and if necessary, roil a third lime.
Use hand roller in areas which cannot be reached
with large roller. After rolling. Pull up a tile
to check the transfer of dhesive to tile. At
least. 85% of the back should be covered with
adhesive to ensure proper adhesion and electrical
performance.
- IMPORTANT! ANY ADHESIVE
AT SEAMS OR ON FINISHED SURFACE OF TILE MUST
BE REMOVED WHILE ADHESIVE IS STILL WET,
using a cloth dampened with water or alcohol.
Clean tools promptly with water or alcohol,
(Caution: Alcohol is flammable. Follow cautions
on container label.)
- Avoid exposure of tile to
excessive heat, such as direct sunlight, until
adhesive has completely set.
- Avoid traffic over finished
floor for at least 48 hours after installation.
PAGE
1 | PAGE
2 | PAGE
3 |